1. How to Set Up the File
Step 1
To begin, sketch out your concept.
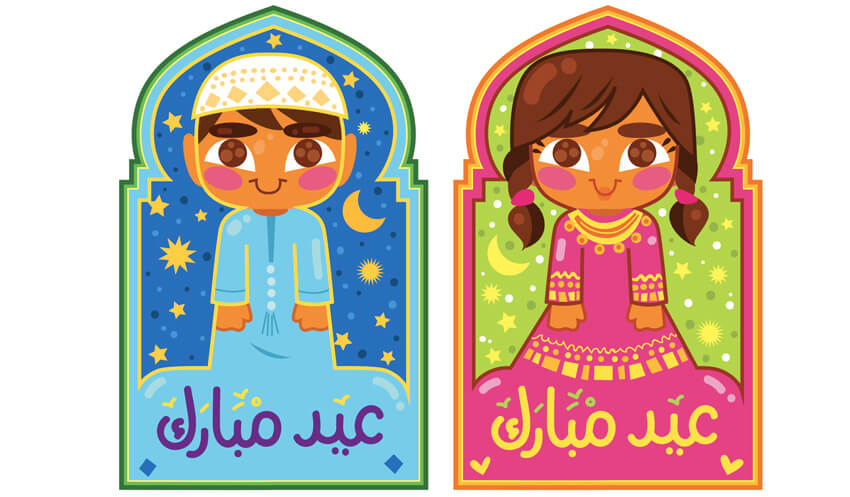
The sketch below is the concept I had in mind: two card designs, one for girls and the other for boys. There will be a cutout along the arms to slip the money through.
Sketch your concept, scan it, and save as JPG, to upload it onto Adobe Illustrator.
If you are short on time, you can always head over to GraphicRiver to find a selection of illustrated graphics to use.

Step 2
Open Adobe Illustrator CC. Let’s set up a New Document (File > New or Command-N).
For this project, use the following settings:
Select Print.
Preset Details: Eid_Money_Cards
- Number of Artboards: 1
- Width: 10 cm
- Height: 15 cm
- Units: Centimeters
And click Create.

Step 3
Place one side of the sketch onto the Artboard.
Place (Command-Shift-P) and drag the image bounding box to take its place on the artboard. Open the Layers panel: Window > Layers.
Open the sub-menu of the Layers panel:
- Name: Sketch
- Select Lock
- Dim Images to: 20%
- OK
Create New Layer, on top of the ‘Sketch’, and name it ‘Outline’. File > Save (Command-S).

Advertisement
2. How to Create the Borders & Artwork Outlines
Step 1
We begin by laying out our card’s border.
Select the Pen Tool (P), with a Fill of null and black Stroke of 1 pt, and draw half the border.
- Then, with the object selected, select the Reflect Tool (O), which is located under the Rotate Tool in the Tools panel.
- Click on the center edge of the object to set one point of the axis. Hold down Option–Alt and click to set.

Step 2
Next we need to join the borders to create one compound shape, and create a border outline.
Select both borders with the Direct Selection Tool (V). Open the Pathfinder panel: Window > Pathfinder. Select Unite to create a compound shape.

After creating our compound shape, with the border selected, we need to create the inner and outer border lining.
First, to create the outer border:
From the Main Menu: Object > Path > Offset Path:
- Set Offset at 0.2cm
- Joins: Miter
- Check Preview, to view
- OK.

Second, create the inner border:
Select the original border, with the Selection Tool (V).
Main Menu: Object > Path > Offset Path. To offset inwards, use the minus sign (-), set the Offset to -0.35 cm, and click OK.

Advertisement
Step 3
Let’s continue by drawing the other symmetrical elements within our design, like the head features and body.
Use the Pen Tool (P), with a black Stroke of 1 pt, and freehand draw half the head, Taqiyah (Islamic Prayer Head Wear), the eye outline, eyebrow, ear and body shape.

Then select the Ellipse Tool (L) and draw in the pupils and cheeks, as well as the neck area.

Step 4
Let’s mirror the illustrated parts.
- Select the head, Taqiyah Cap, eye, eyebrow, cheeks, ear and body shapes.
- Select the Reflect Tool (O), from the Tools panel.
- Set the light blue, Reflect axis point, on the edge, as shown.
- Hold down Option-Alt, and click to reflect the objects.

Then we need to select each shape and its respective reflection and Unite them, using the Unite option from the Pathfinder panel to create a single compound shape.

Last, select the body shape with the inner border lining and Minus Front, from the Pathfinder panel, so it lines up along the edges.

Step 5
Next we need to add in the text, but by drawing it.
Instead of working with Arabic fonts and getting lost in letters and rigid-looking font styles, I prefer to draw in the text, for a more personal feel.
Select the Blob Brush Tool (Shift-B) from the Tools panel. The Blob Brush is similar to a thick pen. Select a black Stroke, no Fill. Set the blob size you want to draw the text with, and draw in the text.
- A shortcut to manage Blob Brush Tool size: Click the left square bracket key ([) to shrink the brush size and the right square bracket (]) to enlarge.
- Select a smaller blob brush, to add in the Arabic pronunciation marks.
- You can use the Eraser Tool (Shift-E) to erase any mistakes with the blob shapes, if needed.

Step 6
Now that the initial basics are laid out, we need to duplicate the artboard for the girl money-card, since they both share similar borders and features.
Select the boy’s Taqiyah Cap, and Lock it using the Command-2 shortcut, so it’s not duplicated with the Artboard.
From the Main Menu: File > Document Setup.
The Document Setup dialog box will open.
Select Edit Artboards.
Hold down the Shift–Alt keys and drag our Artboard onto the girl card sketch, to duplicate it.

Step 7
The girl is wearing a dress, so we need to adjust her outline and widen the bottom part to form a dress.
Select the Direct Selection Tool (A), select each anchor point separately, hold the Shift key down to constrain movement to a 90° angle, and drag along, as so.

Step 8
Let’s fill in the remaining details, using some basic tools.
First use the Pen Tool (P), with a Fill to null and black Stroke of 1 pt, and trace in the main line work, as so:

Step 9
Lock (Command-2) everything except the ears, head hair, and borders.

What we will do is duplicate our elements to create a color fill layer.
In the Layers panel sub-menu, select Duplicate ‘Outlines’.

This will create the layer ‘Outline Copy’ over the ‘Outlines’ layer.
- Position the ‘Outline Copy’ under the ‘Outlines’ layer, for us to create our fills under the line work.
- Rename ‘Outline Copy’ to ‘Fill’.
- Lock the ‘Outlines’ layer.
- File > Save (Command-S), to save your Illustrator file.

Step 10
In the ‘Fill’ layer, let’s give a color fill to the unlocked shapes.
You may need to Arrange objects, as you color along. Use the following shortcuts:
- Arrange > Bring to Front (Command-Shift-])
- Arrange > Bring Forward (Command-])
- Arrange > Send Backward (Command-[)
- Arrange > Send to Back (Command-Shift-[)

Unlock All (Command-Option-2) the rest of our elements. Give each one a color Fill of your choice.

Step 11
Next, with the Selection Tool (V), select the lines that have no fills and Delete, since they will not need a fill.

Lock the ‘Fill’ layer, and Unlock ‘Outlines’ layer.
Unlock All (Command-Option-2) elements within the Outlines’ layer.
Delete all elements whose outlines we don’t need, like the ears, cheeks, hair, patterns, etc. I left a few, as shown below.

Step 12
Open the Stroke panel (Window > Stroke), and alter the stroke width of the remaining black strokes to create variance in the artwork.

Next we need to combine the head outline with the body.
Select both the head and body shape of the boy with the Selection Tool (V), and from the Pathfinder panel, Minus Front to subtract from the shape area.

Repeat the same steps, with the girl’s head and body shapes.
Then select the Scissors Tool (C) to cut the away the top anchor points that meet with the boy’s cap and head as well as the girl’s hair and head.

3. How to Add Detail & Flair to the Illustration
Step 1
Let’s start by coloring in our black strokes.

Unlock the ‘Fill’ layer, and color in all the shapes and arrange the artwork elements so they look harmonious together.

Step 2
Let’s create the moon crescent for our background.
Make sure you are on the ‘Fill’ layer. Select the Ellipse Tool (L), with a black Stroke, and Fill null. Draw two ellipses, overlapping each other.

Next, select both ellipses, and from the Pathfinder panel, Minus Front to subtract from the shape area, and you’ve got yourself a moon!
Give it a yellowish color Fill and place it somewhere on the background setting.
Create another crescent for the girl’s background.

Step 3
Let’s add stars!
Select the Star Tool under the Rectangle Tool menu, and select a yellowish fill.
- Drag until the star is the desired size.
- You can drag the pointer to rotate the star.
- A cool trick is to press the Up Arrow and Down Arrow to add and decrease points of the star!
Draw stars on both card backgrounds.

Step 4
Next, we need to create small starlight points.
Select the Blob Brush Tool (Shift-B), from the Tools panel.
Chose light and dark blue stroke colors, for the boy’s background, and draw in blob points of various sizes.
- Remember the shortcut to manage the size of the Blob Brush: Click the left square bracket key ([) to shrink the brush size and the right square bracket (]) to enlarge.
Repeat the process with the girl’s card background, but use white and dark green strokes.

Step 5
For the final touches, we need to add lighter tones of highlights to some of the elements to give it some pizzazz.
Continue to use the Blob Brush Tool (Shift-B), using a light blue stroke color, and draw in the boy’s thobe (dress) neck tie, and place some highlights on his thobe, a pattern on his hat, and highlights on his face.

Step 6
Again, use the Blob Brush Tool (Shift-B), and draw in light tone highlights on the girl’s hair and a pattern on the dress. You can even throw in some lip color.

Step 7
Finally, from the Layers panel, trash the ‘Sketch’ layer. File > Save (Command-S) the file.
Print it out on nice semi-glossy thick paper, cut the borders and cut along the outer lining of the arms, and slide the Eid gift money through, and you are done!
Hand out the holiday treats to all the little ones for the Eid holiday.
You can even make them more personalized by writing their names on each card!