1. How to Create a New Document and Set Up a Grid to Create Ai Splatter Brushes
Hit Control-N to create a new document. Select Pixels from the Units drop-down menu, enter 850 in the width and height boxes, and then click that Advanced Settings button. Select RGB for the Color Mode, set the Raster Effects to Screen (72 ppi), and then click Create Document.
Enable the Grid (View > Show Grid) and Snap to Grid (View > Snap to Grid). You will need a grid every 5 px, so simply go to Edit > Preferences > Guides & Grid, and enter 5 in the Gridline every box and 1 in the Subdivisions box. Try not to get discouraged by all that grid—it will make your work easier, and keep in mind that you can easily enable or disable it using the Control-“ keyboard shortcut.
You can learn more about Illustrator’s grid system in this short tutorial from Andrei Stefan: Understanding Adobe Illustrator’s Grid System.
You should also open the Info panel (Window > Info) for a live preview with the size and position of your shapes. Don’t forget to set the unit of measurement to pixels from Edit > Preferences > Units. All these options will significantly increase your work speed.
Now that you’re set, let’s start work on the Adobe Illustrator splatter brushes.

2. How to Create Your First Ai Splatter Brush
Step 1
Pick the Ellipse Tool (M) and simply click on your artboard to open the Ellipse window. Set the Width and Height to 300 px and then click OK to create a 300 px circle.

Step 2
Make sure that your circle is still selected, remove the stroke color, and focus on the fill. Apply a black to white gradient from the Swatches panel (Window > Swatches) and make it a radial gradient using the Radial Gradient button from the Gradient panel (Window > Gradient).

Step 3
Make sure that your shape stays selected and go to Effect > Texture > Grain. Move both sliders to 100 and select Contrasty from the drop-down menu, and then click OK. Doing this will help create that amazing splatter effect.

Step 4
Go to Object > Expand Appearance, click the Image Trace button from the control panel, and open the Image Trace panel using that small button.
Drag the Threshold slider to 210 and then click the Advanced button. Set the Path to 80%, the Corners to 0%, and the Noise to 1 px. Uncheck the Snap Curves to Lines box and check the Ignore White box, and then click the Expand button from the control panel.

Step 5
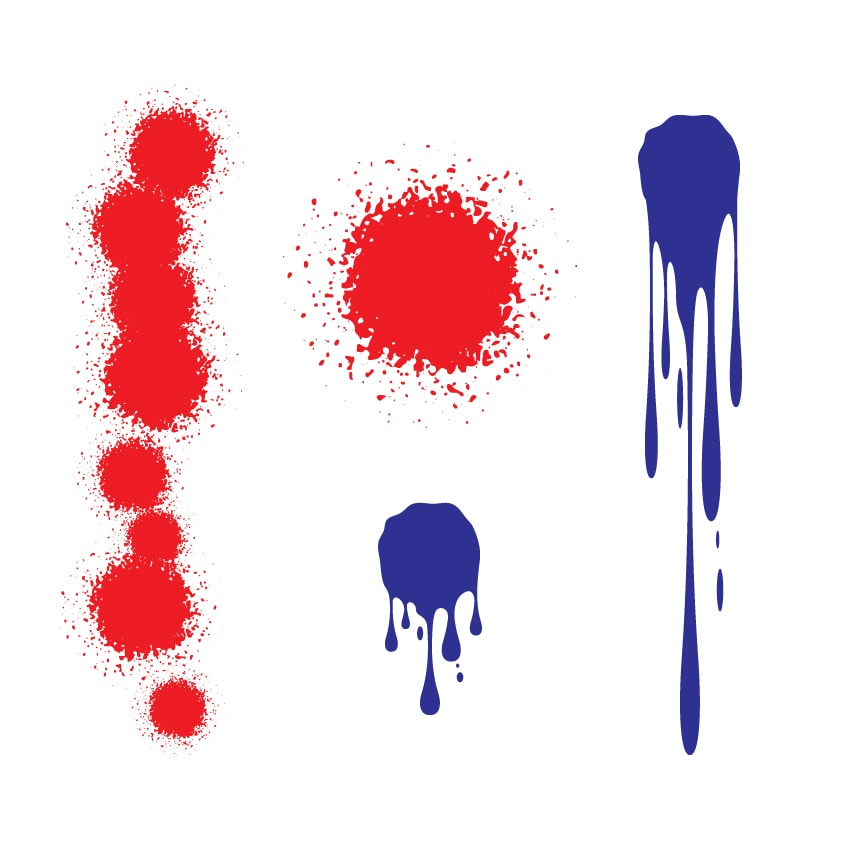
Turn your group of shapes into one compound path (Object > Compound Path > Make or Control-8) and change its color to R=237 G=28 B=36. We’ll use this compound path to create our scatter brush in Illustrator.

3. How to Create an Ai Splatter Brush
Step 1
Pick the Ellipse Tool (L), create a 100 px circle, and fill it with R=46 G=49 B=146.

Step 2
Using the same tool, create a 10 px circle and a 20 x 30 px oval shape. Fill both shapes with R=46 G=49 B=146 and place them as shown in the following image. Make sure that you leave a 45 px gap between these two shapes.

Step 3
Pick the Rectangle Tool (M), create a 20 x 65 px shape and place it as shown in the first image.
Focus on the top side of this rectangle and pick the Direct Selection Tool (A). Select the left anchor point and move it 5 px to the right, and then select the right anchor point and move it 5 px to the left.
Select the shape made in this step along with the two oval shapes made in the previous step, and click the Unite button from the Pathfinder panel (Window > Pathfinder).

Step 4
Make sure that the shape made in the previous step is still selected, and go to Effect > Warp > Bulge. Enter the settings shown in the following image, click OK, and go to Object > Expand Appearance.

Step 5
Now you can disable the Grid (Control-“) and Snap to Grid (Shift-Control-“). Select that drip shape and place it roughly as shown in the first image.
Multiply this shape (Control-C > Control-V), resize these copies, and spread them as shown in the second image.

Step 6
Pick the Pen Tool (P) and draw a path that makes the connection between those drips and the main circle a lot smoother, as shown in the first image.
Switch to the Ellipse Tool (L) and add some smaller drips, as shown in the second image.

Step 7
Using the Pencil Tool (N), add a wavy path on the top half of the circle.

Step 8
Select all your blue shapes and click the Unite button from the Pathfinder panel, and then turn the resulting group of shapes into a compound path (Object > Compound Path > Make or Control-8). We’ll use this compound path to create a drip vector brush in Illustrator.

4. How to Save and Use Ai Splatter Brushes
Step 1
Select your red compound path and click the New Brush button from the Brushes panel (Window > Brushes). Check the Scatter Brush box and click OK. Enter all the attributes shown in the following image, click OK, and you’ve got your paint splatter Illustrator brush. Start testing the splatter effect to see if you need to make some adjustments.

Step 2
Select your blue compound path and again click the New Brush button from the Brushes panel (Window > Brushes). This time, check the Art Brush box, and click OK.
Check the Stretch Between Guides box and focus on that brush preview. Drag one of those guides where the drips start and the other where the drips end to make sure that this is the only section of the brush that stretches when you use the brush. Enter the rest of the settings shown in the following image, click OK, and you’ve got your paint splatter Illustrator brush.
Alternatively, you can change the color of this compound path to red and easily create a blood splatter brush in Illustrator. That’s it—now you know how to draw a blood splatter digitally in Illustrator.

Step 3
Finally, you can pick the Brush Tool (B), select one of your Adobe Illustrator splatter brushes, and test it.
