1. How to Set Up a New Project File
Assuming you already have Illustrator up and running in the background, bring it up and let’s set up a New Document (File > New or Control-N) using the following settings:
- Number of Artboards: 1
- Width: 1000 px
- Height: 600 px
- Units: Pixels
And from the Advanced tab:
- Color Mode: RGB
- Raster Effects: Screen (72ppi)
- Preview Mode: Default

2. How to Set Up a Custom Grid
Since we’re going to be creating the icons using a pixel-perfect workflow, we’ll want to set up a nice little Grid so that we can have full control over our shapes.
Step 1
Go to the Edit > Preferences > Guides & Grid submenu, and adjust the following settings:
- Gridline every: 1 px
- Subdivisions: 1

Quick tip: you can learn more about grids by reading this in-depth piece on How Illustrator’s Grid System Works.
Step 2
Once we’ve set up our custom grid, all we need to do in order to make sure our shapes look crisp is enable the Snap to Grid and Snap to Pixel options found under the View menu, which will transform into Snap to Pixel each time you enter the Pixel Preview mode (if you’re using an older version of the software).
Now, if you’re new to the whole “pixel-perfect workflow”, I strongly recommend you go through my How to Create Pixel-Perfect Artwork tutorial, which will help you widen your technical skills in no time.
3. How to Set Up the Layers
With the new document created, it would be a good idea to structure our project using a couple of layers, since this way we can maintain a steady workflow by focusing on one icon at a time.
That being said, bring up the Layers panel, and create a total of six layers, which we will rename as follows:
- layer 1: reference grids
- layer 2: fruit
- layer 3: dairy
- layer 4: vegetables
- layer 5: grains
- layer 6: meat and eggs

4. How to Create the Reference Grids
Thereference grids (or base grids) are a set of precisely delimited reference surfaces, which allow us to build our icons by focusing on size and consistency.
Usually, the size of the grids determines the size of the actual icons, and they should always be the first decision you make once you start a new project, since you’ll always want to start from the smallest possible size and build on that.
Now, in our case, we’re going to be creating the icon pack using just one size, more exactly 128 x 128 px, which is a fairly large one.
Step 1
Start by locking all but the “reference grids” layer, and then grab the Rectangle Tool (M) and create a 128 x 128 px orange (#F15A24) square, which will help define the overall size of our icons.

Step 2
Add a smaller 120 x 120 px one (#FFFFFF) which we will position on top of the previous shape, since it will act as our active drawing area, thus giving us an all-around 4 px padding to work with.

Step 3
Select and group the two squares together using the Control-G keyboard shortcut, center aligning them to the underlying Artboard afterwards. Create the remaining grids using four copies (Control-C > Control-F) spaced horizontally with a 40 px gap between each one, locking the current layer before moving on to the next section.

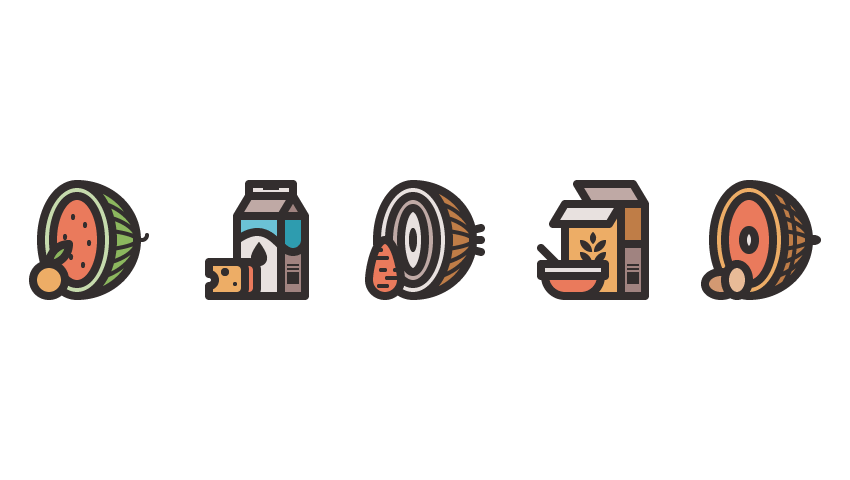
5. How to Create the Fruit Icon
Assuming you’ve successfully managed to create the little reference grids, move on to the next layer (that would be the second one), and let’s kick off the project by creating the first food group.
Step 1
Start working on the melon’s side section by creating a 120 x 112 px ellipse, which we will color using #8CB75E and then adjust by selecting its left anchor point using the Direct Selection Tool (A) and then deleting it by pressing Delete. Center align the resulting shape to the underlying active drawing area, positioning it at a distance of 12 px from its right edge.

Step 2
Add the inner pair of horizontal stripes, using a 120 x 22 px ellipse with a 4 px thick Stroke (#332E2E), which we will center align to the previously created shape’s right edge.

Step 3
Create the middle stripes using a slightly taller 120 x 54 px ellipse with a 4 px thick Stroke (#332E2E), which we will align to the melon’s side section as we did with the previous one.

Step 4
Add the outer facing stripes using a 120 x 82 px ellipse with a 4 px thick Stroke (#332E2E), making sure to select and group all of the melon’s stripes using the Control-G keyboard shortcut.

Step 5
Since we’ll want the stripes to remain contained within the surface of the melon’s side section, we’ll have to mask them using a copy (Control-C) of the green shape, which we will paste (Control-F) in front of them, and then with both the copy and the ellipses selected, right click > Make Clipping Mask.

Step 6
Give the side section an outline using the Stroke method, by creating a copy of it (Control-C), which we will paste in front (Control-F) and then adjust by first changing its color to #332E2E and then flipping its Fill with its Stroke (Shift-X). Set the resulting outline’s Weight to 8 px and its Corner to Round Join, selecting and grouping all of the current section’s composing shapes together afterwards using the Control-G keyboard shortcut.

Step 7
Start working on the fruit’s front section by creating its outer body using a 72 x 112 px ellipse (#C6DBAD) with an 8 px thick outline (#332E2E), which we will group (Control-G) and then position onto the active drawing area so that its center overlaps the side section’s left edge.

Step 8
Add the melon’s inner body, using a 48 x 88 px ellipse (#EA7A5C) with an 8 px thick outline (#332E2E), which we will group (Control-G) and then center align to the previously created shapes.

Step 9
Take a couple of moments and add the fruit’s seeds using some 4 x 6 px ellipses (#332E2E), which we will position as you can see in the reference image. Once you have all the seeds in place, select and group (Control-G) them together, doing the same for the melon’s front section.

Step 10
Finish off the melon by adding its stem using a 10 x 10 px circle with a 4 px thick Stroke (#332E2E) with a Round Cap, which we will adjust by removing its upper half. Position the resulting shape onto the active drawing area’s right edge, at a distance of 58 px from its bottom one, making sure to select and group (Control-G) all of the fruit’s composing shapes afterwards.

Step 11
Start working on the little orange by creating its main body using a 32 x 32 px circle (#EDAD66) with an 8 px thick outline (#332E2E), which we will group (Control-G) and then position in the active drawing area’s bottom-left corner.

Step 12
Finish off the orange, and with it the icon itself, by adding the little leaf which we will create using a 20 x 20 px square (#8CB75E) which we will adjust by setting the Radius of its top-left and bottom-right corners to 20 px from within the Transform panel’s Rectangle Properties. Give the resulting shape an 8 px thick outline (#332E2E) with a Round Join, grouping (Control-G) and positioning the two shapes on top of the orange, at a distance of 16 px from the active drawing area’s left edge. Once you’re done, select and group (Control-G) all of the icon’s composing sections together, before moving on to the next one.
6. How to Create the Dairy Icon
Assuming you’ve finished working on the first icon, lock its layer and then move on up to the next one (that would be the third one), where we’ll start working on the second food group.
Step 1
Start working on the milk carton by creating the front section of its lower body using a 44 x 80 px rectangle, which we will color using #E8E1DF and then position at a distance of 40 px from the active drawing area’s left edge, and just 4 px from its bottom one.

Step 2
Add the carton’s side section using a 24 x 80 px rectangle (#A08380), which we will position on the right side of the previously created shape.

Step 3
Take a couple of moments and draw the carton’s swirl using the Pen Tool (P) with the Fill color set to #6BC2D6, moving on to the next step once you’re done.

Step 4
Give the swirl an 8 px thick outline (#332E2E) using the Stroke method, selecting and grouping the two together (Control-G). Make sure to create a copy (Control-C) of them, which we will paste in front (Control-F).

Step 5
Select and mask each of the two swirls using a copy of the underlying sections as Clipping Masks (right click > Make Clipping Mask), making sure to change the color of the side section’s fill shape to #2E9CAF.

Step 6
Give the two sections an 8 px thick outline (#332E2E) with a Round Join, individually selecting and grouping each of their composing shapes together using the Control-G keyboard shortcut.

Step 7
Create the front section’s drop using a 16 x 16 px circle (#332E2E), which we will center align to the larger rectangle, positioning it at a distance of 26 px from its bottom edge.

Step 8
Adjust the circle’s shape by first selecting and pinching its top anchor point using the Anchor Point Tool (Shift-C) and then pushing it to the top by 8 px using the Move tool (right click > Transform > Move > Vertical > 8 px). Once you’re done, select and group (Control-G) all of the front section’s composing shapes before moving on to the next step.

Step 9
Start adding the nutritional information bars to the carton’s side, by creating two 12 x 2 px rectangles (#332E2E), vertically stacked 2 px from one another, which we will position at a distance of 8 px from the swirl’s bottom edge.

Step 10
Add the larger shape using a 12 x 12 px square (#332E2E), which we will position 2 px below the bottom bar. Select and group (Control-G) all three rectangles together, doing the same for the side section’s composing shapes afterwards.

Step 11
Start working on the carton’s upper body by creating the main shape for its side section using a 24 x 20 px rectangle (#A08380), which we will position on top of the shapes that we’ve just grouped.

Step 12
Adjust the shape that we’ve just created by adding a new anchor point in the center of its top edge using the Add Anchor Point Tool (+), and then removing its side ones using the Delete Anchor Point Tool (-).

Step 13
Give the resulting shape an 8 px thick outline (#332E2E) with a Round Join, selecting and grouping them both together using the Control-G keyboard shortcut.

Step 14
Add the upper body’s front section using a 44 x 20 px rectangle (#BFA9A5), which we will position as seen in the reference image.

Step 15
Adjust the shape that we’ve just created by selecting its top anchor points using the Direct Selection Tool (A) and then pushing them to the right by 12 px using the Move tool (right click > Transform > Move > Horizontal > 12 px).

Step 16
Give the resulting shape an 8 px thick outline (#332E2E), selecting and grouping (Control-G) the two together before moving on to the next step.

Step 17
Create the milk carton’s folded top section using a 44 x 12 px rectangle (#E8E1DF) with an 8 px thick outline (#332E2E), which we will group (Control-G) and then position as seen in the reference image.

Step 18
Finish off the milk carton by adding a 16 x 6 px (#332E2E) rectangular insertion to the center of the previously created section’s upper edge, selecting and grouping (Control-G) them together, and doing the same for the entire carton afterwards.

Step 19
Start working on the little cheese triangle by creating its side section using a 20 x 34 px rectangle (#EA7A5C) with an 8 px right Corner Radius and an 8 px thick outline (#332E2E), which we will group (Control-G) and then align to the milk carton’s bottom-left corner.

Step 20
Add the front section using a 36 x 34 px rectangle (#EDAD66) with an 8 px right Corner Radius, which we will position at a distance of 12 px from the active drawing area’s left edge.

Step 21
Adjust the shape by creating a 12 x 12 px circle (highlighted with red), which we will position on the front section’s left edge, at a distance of 10 px from its bottom one. Once you have the shape in place, simply select both it and the larger section and use Pathfinder’s Minus Front Shape Mode to create the cutout.

Step 22
Finish off the cheese triangle, and with it the icon itself, by giving the resulting shape an 8 px thick outline (#332E2E), followed by two circular insertions (8 x 8 px; 4 x 4 px – #332E2E). Once you’re done, select and group (Control-G) all of the cheese’s composing sections together, doing the same for the entire icon afterwards.
7. How to Create the Vegetables Icon
Assuming you’ve finished working on the second icon lock its layer and then move on up to the next one (that would be the fourth one), where we’ll start working on the third food group.
Step 1
Since the onion is pretty much identical in shape and size to the melon, we’re going to quickly unlock the fruit icon’s layer and create a copy (Control-C) of the melon, which we will paste (Control-F) onto the current layer, aligning it to the active drawing area’s right edge.

Step 2
Ungroup the copy that we’ve just created (right click > Ungroup), and then take a couple of moments to remove its seeds and stem as seen in the reference image.

Step 3
Adjust the remaining shapes by changing the color of the side section’s fill shape to #BF7D47, its front section’s outer body to #E8E1DF, and its inner one to #BFA9A5.

Step 4
Add another layer to the onion’s front section using a 24 x 64 px ellipse (#E8E1DF) with an 8 px thick outline (#332E2E), which we will group (Control-G) and then center align to the larger underlying section.

Step 5
Create another smaller 8 x 24 px ellipse, which we will color using #332E2E and then center align to the previously created section. Once you have the shape in place, select and group (Control-G) all of the front section’s composing shapes together before moving on to the next step.

Step 6
Finish off the onion by drawing its roots using three 8 px thick Stroke lines (#332E2E) with a Round Cap, which we will position onto the side section’s right side as seen in the reference image. Take your time, and once you’re done, select and group (Control-G) all of vegetable’s composing sections before moving on to the next step.

Step 7
Start working on the little carrot by creating its main body using a 32 x 32 px circle (#EA7A5C), which we will position at a distance of 4 px from the active drawing area’s left and bottom edges.

Step 8
Adjust the shape of the circle that we’ve just created by selecting its top anchor point using the Direct Selection Tool (A) and then pushing it to the top by 24 px using the Move tool (right click > Transform > Move > Vertical > -24 px).

Step 9
Give the resulting shape an 8 px thick outline using the Stroke method, making sure to set its color to #332E2E.

Step 10
Finish off the carrot, and with it the icon itself, by adding the little horizontal detail lines using a couple of 4 px tall rounded rectangles (#332E2E) with a 2 px Corner Radius. Once you have the lines in place, select and group (Control-G) them together, doing the same for the carrot and the entire icon afterwards.
8. How to Create the Grains Icon
Make sure you’ve locked the previous layer, and then move on up to the next one (that would be the fifth one) where we will create the fourth food group.
Step 1
Start working on the cereal box by creating its front section using a 56 x 92 px rectangle (#EDAD66) with an 8 px thick outline (#332E2E) with a Round Join, which we will group (Control-G) and then align to the active drawing area’s bottom edge, positioning it at a distance of 28 px from its left one.

Step 2
Add the grain symbol’s bottom seeds using four 12 x 12 px squares (#332E2E), which we will position as seen in the reference image.

Step 3
Adjust the shape of the left-sided rectangles by setting the Radius of their bottom-left and top-right corners to 12 px from within the Transform panel’s Rectangle Properties.

Step 4
Repeat the same process for the right-sided squares, only this time adjust the Radius of their top-left and bottom-right corners using the same 12 px value.

Step 5
Add the top seed using a 6 x 12 px ellipse (#332E2E), which we will position between the top two shapes that we’ve just adjusted, at a distance of 8 px from their bottom edges.

Step 6
Adjust the shape of the ellipse that we’ve just created by pinching its top and bottom anchor points using the Anchor Point Tool (Shift-C) to make them pointy. Once you’re done, select and group (Control-G) all the seeds together, doing the same for the box’s front section.

Step 7
Create the lower body of the box’s side section using a 24 x 52 px rectangle (#A08380) with an 8 px thick outline (#332E2E), which we will group (Control-G) and then position onto the right side of the larger front.

Step 8
Add the side section’s upper body using a 24 x 40 px rectangle (#BF7D47) with an 8 px thick outline (#332E2E), which we will group (Control-G) and then position on top of the previously created shapes.

Step 9
As we did with the milk carton, take a couple of moments and add in the little nutritional value bars using two 12 x 2 px rectangles (#332E2E) vertically stacked 2 px above a 12 x 12 px square (#332E2E). Group (Control-G) and then center align all three shapes to the larger underlying section, positioning them at a distance of 8 px from its bottom edge. Once you’re done, select and group (Control-G) all of the side section’s composing shapes before moving on to the next step.

Step 10
Create the box’s front folded section using a 56 x 20 px rectangle (#E8E1DF), which we will adjust by selecting and pushing its bottom anchor points to the left by 12 px (right click > Transform > Horizontal > -12 px). Give the resulting shape an 8 px thick outline (#332E2E) with a Round Join, grouping (Control-G) and positioning the two on top of the larger front section.

Step 11
Create the top folded section using a copy (Control-C > Control-F) of the one from the previous step, which we will first horizontally reflect (right click > Transform > Reflect > Horizontal) and then position on top of the box, making sure to change its fill color to #BFA9A5. Take your time, and once you’re done, select and group (Control-G) all of the box’s composing sections before moving on to the next step.

Step 12
Start working on the little bowl by creating its lower body using a 56 x 20 px rectangle (#EA7A5C) with a 20 px bottom Corner Radius and an 8 px thick outline (#332E2E), which we will group (Control-G) and then align to the active drawing area’s bottom edge, positioning them at a distance of 8 px from its left one.

Step 13
Add the bowl’s upper body using a 64 x 12 px rectangle (#E8E1DF) with an 8 px thick outline (#332E2E), which we will group (Control-G) and then position on top of the previously created shapes.

Step 14
Finish off the bowl, and with it the icon itself, by drawing the spoon’s handle using a diagonal 8 px thick Stroke line (#332E2E), which we will position on the left side of the object, as seen in the reference image. Once you’re done, don’t forget to select and group (Control-G) all of the bowl’s composing shapes together, doing the same for the entire icon afterwards.
9. How to Create the Protein Icon
We are now down to our fifth and last food group, which is probably the easiest one to create, so make sure you’re on the right layer (that would be the sixth one) and let’s finish this!
Step 1
Create the ham using a copy (Control-C) of the first icon’s melon, which we will paste (Control-F) onto the current layer, making sure to align it to the empty active drawing area’s right edge.

Step 2
As we did with the onion, ungroup the copy that we’ve just created (right click > Ungroup), and then take a couple of moments to remove its seeds and stem as seen in the reference image.

Step 3
Adjust the remaining shapes by changing the color of the front section’s outer body to #EDAD66 and its inner body to #EA7A5C.

Step 4
Isolate the side section’s horizontal rings by double-clicking on their group, and then add a vertical ring using a 92 x 132 px ellipse with a 4 px thick Stroke (#332E2E), which we will center align to the active drawing area’s left edge. Once you’re done, simply press Escape to exit Isolation Mode.

Step 5
Move back to the front section and add the little bone slice using a 12 x 20 px ellipse (#E8E1DF) with an 8 px thick outline (#332E2E), which we will group (Control-G) and then center align to its inner body.

Step 6
Finish off the ham by adding its little tail section using a 16 x 10 px ellipse (#332E2E), which we will center align to the active drawing area’s right edge, making sure to select and group (Control-G) all of its composing sections before moving on to the next step.

Step 7
Create the first egg using a 32 x 24 px ellipse (#D39972) with an 8 px thick outline (#332E2E), which we will group (Control-G) and then position in the active drawing area’s bottom-left corner.

Step 8
Finish off the icon, and with it the project itself, by adding the second egg using a 24 x 32 px ellipse (#E8BB97) with an 8 px thick outline (#E8BB97), which we will group (Control-G), and then position over the previously created shapes, at a distance of 20 px from the active drawing area’s left edge.
Take your time, and once you’re done, select and group (Control-G) all of the current icon’s composing sections together before saving the project.